


Build and Deploy a Maven Project
Prerequisites
- You need to enable the Kube AI Hub DevOps System.
- You need to have a Docker Hub account.
- You need to create a workspace, a DevOps project, and a user account, and this user needs to be invited into the DevOps project with the role of
operator. For more information, see Create Workspaces, Projects, Users and Roles.
Workflow for a Maven Project
As is shown in the graph below, there is the workflow for a Maven project in Kube AI Hub DevOps, which uses a Jenkins pipeline to build and deploy the Maven project. All steps are defined in the pipeline.
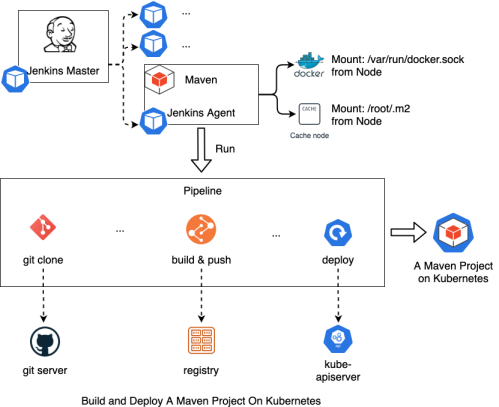
At first, the Jenkins Master creates a Pod to run the pipeline. Kubernetes creates the Pod as the agent of Jenkins Master, and the Pod will be destroyed after the pipeline finished. The main process includes cloning code, building and pushing an image, and deploying the workload.
Default Configurations in Jenkins
Maven version
Execute the following command in the Maven builder container to get version information.
mvn --version

Apache Maven 3.5.3 (3383c37e1f9e9b3bc3df5050c29c8aff9f295297; 2018-02-24T19:49:05Z)
Maven home: /opt/apache-maven-3.5.3
Java version: 1.8.0_232, vendor: Oracle Corporation
Java home: /usr/lib/jvm/java-1.8.0-openjdk-1.8.0.232.b09-0.el7_7.i386/jre
Default locale: en_US, platform encoding: UTF-8
Maven cache
The Jenkins Agent mounts the directories by Docker Volume on the node. The pipeline can cache some special directories such as /root/.m2, which are used for Maven building and the default cache directory for Maven tools in Kube AI Hub DevOps, so that dependency packages are downloaded and cached on the node.
Global Maven settings in the Jenkins Agent
The default file path of Maven settings is maven and the configuration file path is /opt/apache-maven-3.5.3/conf/settings.xml. Execute the following command to get the content of Maven settings.
kubectl get cm -n kubesphere-devops-worker ks-devops-agent -o yaml
Network of Maven Pod
The Pod labeled maven uses the docker-in-docker network to run the pipeline. Namely, /var/run/docker.sock in the node is mounted to the Maven container.
A Maven Pipeline Example
Prepare for the Maven project
- Ensure you build the Maven project successfully on the development device.
- Add the Dockerfile to the project repository to build the image. For more information, refer to https://github.com/kubesphere/devops-maven-sample/blob/master/Dockerfile-online.
- Add the YAML file to the project repository to deploy the workload. For more information, refer to https://github.com/kubesphere/devops-maven-sample/tree/master/deploy/dev-ol. If there are different environments, you need to prepare multiple deployment files.
Create credentials
| Credential ID | Type | Where to Use |
|---|---|---|
| dockerhub-id | Username and password | Registry, such as Docker Hub |
| demo-kubeconfig | kubeconfig | Workload deployment |
For details, refer to the Credential Management.
Create a project for workloads
In this example, all workloads are deployed in kubesphere-sample-dev. You must create the project kubesphere-sample-dev in advance.
Create a pipeline for the Maven project
-
Go to Pipelines of your DevOps project and click Create to create a pipeline named
maven. For more information, see Create a Pipeline - using Graphical Editing Panel. -
Go to the details page of the pipeline and click Edit Jenkinsfile.
-
Copy and paste the following content into the displayed dialog box. You must replace the value of
DOCKERHUB_NAMESPACEwith yours. When you finish editing, click OK to save the Jenkinsfile.pipeline { agent { label 'maven' } parameters { string(name:'TAG_NAME',defaultValue: '',description:'') } environment { DOCKER_CREDENTIAL_ID = 'dockerhub-id' KUBECONFIG_CREDENTIAL_ID = 'demo-kubeconfig' REGISTRY = 'docker.io' // need to replace by yourself dockerhub namespace DOCKERHUB_NAMESPACE = 'Docker Hub Namespace' APP_NAME = 'devops-maven-sample' BRANCH_NAME = 'dev' PROJECT_NAME = 'kubesphere-sample-dev' } stages { stage ('checkout scm') { steps { // Please avoid committing your test changes to this repository git branch: 'master', url: "https://github.com/kubesphere/devops-maven-sample.git" } } stage ('unit test') { steps { container ('maven') { sh 'mvn clean test' } } } stage ('build & push') { steps { container ('maven') { sh 'mvn -Dmaven.test.skip=true clean package' sh 'docker build -f Dockerfile-online -t $REGISTRY/$DOCKERHUB_NAMESPACE/$APP_NAME:SNAPSHOT-$BRANCH_NAME-$BUILD_NUMBER .' withCredentials([usernamePassword(passwordVariable : 'DOCKER_PASSWORD' ,usernameVariable : 'DOCKER_USERNAME' ,credentialsId : "$DOCKER_CREDENTIAL_ID" ,)]) { sh 'echo "$DOCKER_PASSWORD" | docker login $REGISTRY -u "$DOCKER_USERNAME" --password-stdin' sh 'docker push $REGISTRY/$DOCKERHUB_NAMESPACE/$APP_NAME:SNAPSHOT-$BRANCH_NAME-$BUILD_NUMBER' } } } } stage('deploy to dev') { steps { container ('maven') { withCredentials([ kubeconfigFile( credentialsId: env.KUBECONFIG_CREDENTIAL_ID, variable: 'KUBECONFIG') ]) { sh 'envsubst < deploy/all-in-one/devops-sample.yaml | kubectl apply -f -' } } } } } } -
You can see stages and steps are automatically created on graphical editing panels.
Run and test
-
Click Run, enter
v1for TAG_NAME in the displayed dialog box, and then click OK to run the pipeline. -
When the pipeline runs successfully, you can go to the Run Records tab to view its details.
-
In the project of
kubesphere-sample-dev, new workloads were created. -
On the Services page, view the external access information about the Service created.
 Previous
